
.# Azure Role Assignment – Customer Guide
This guide explains why certain Azure roles need to be configured in your environment, and walks you through how to run the provided script yourself in the Azure portal.
- Why these roles are needed
- Before you start – elevating your access
- Running the script in Azure Cloud Shell
- After the script completes
As part of the Microsoft Cloud Solution Provider (CSP) program, Atea manages your Azure environment on your behalf. To do this effectively, Atea's support team uses dedicated security groups — called Admin Agent groups — that need specific permissions in your Azure tenant.
The script assigns two roles to these groups:
| Role | What it allows |
|---|---|
| Support Request Contributor | Allows Atea to create and manage Azure support tickets on your behalf |
| Quota Request Operator | Allows Atea to request resource quota increases in Azure on your behalf |
These roles are narrow in scope — they do not grant access to your data, virtual machines, databases, or any other resources. They only allow Atea to interact with Microsoft Support and quota management on your behalf.
Without these roles in place, Atea cannot open support tickets or request capacity changes directly with Microsoft, which can delay issue resolution.
To run the script, your account needs either the Owner or User Access Administrator role on the Azure scope you want to use. If your account already has one of these roles directly assigned, you can skip this section.
If you are a Global Administrator in your Microsoft Entra ID (formerly Azure Active Directory) but do not yet have either role, you can grant yourself temporary access using the steps below.
If you are unsure whether you have the required role already, your Atea consultant can check this for you before you proceed.
-
Sign in to the Azure portal.
-
In the left-hand menu, click Microsoft Entra ID (or search for it in the top search bar).
-
In the left-hand menu of Microsoft Entra ID, scroll down and click Properties.
-
Scroll to the bottom of the Properties page and find the section "Access management for Azure resources".
-
Toggle the setting "Can manage access to all Azure subscriptions and management groups in this directory" to Yes.
-
Click Save.
-
Wait 1–2 minutes for the role assignment to take effect.
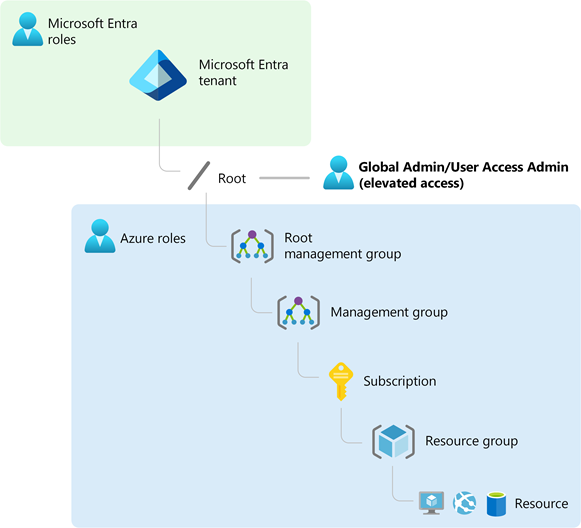
You are now ready to run the script. The toggle grants you User Access Administrator at the root level — the script will detect this automatically.
Security note: This elevated access should only be active while needed. You will be asked to revert this setting after the script has run — see After the script completes.
Azure Cloud Shell is a browser-based terminal built into the Azure portal. It is always signed in as you — no password or login command is needed inside the shell.
-
Sign in to https://portal.azure.com with the same account you used to elevate access.
-
Click the Cloud Shell icon in the top toolbar — it looks like a small terminal window (
>_), located to the right of the search bar.If you have never used Cloud Shell before, a setup wizard will appear. Select PowerShell as the shell type and click Create storage (or confirm creating a storage account) to continue. This is a one-time setup.
-
A terminal panel will open at the bottom of the screen. Wait until you see a prompt like:
PS /home/yourname>This confirms Cloud Shell is ready.
-
Make sure the shell type shown in the top-left of the Cloud Shell panel says PowerShell. If it says Bash, click the dropdown and switch to PowerShell.
The script must be uploaded as a file to Cloud Shell — do not try to run commands from it manually.
Note: The script file is provided as a
.txtfile (RBAC_customer.txt). This is intentional — some systems and email clients block.ps1attachments. The file contains valid PowerShell and can be executed directly from Cloud Shell as described below.
-
In the Cloud Shell toolbar (the bar just above the terminal), click the Upload/Download files button. It looks like a page icon with an arrow, or may be labelled Manage files.
-
Select Upload.
-
In the file picker that opens, navigate to the location where you saved the
RBAC_customer.txtfile (provided by your Atea consultant) and select it. -
Click Open. The file will be uploaded to your Cloud Shell home directory.
-
To confirm the upload succeeded, type the following in the terminal and press Enter:
Get-ChildItemYou should see
RBAC_customer.txtlisted in the output.
-
In the Cloud Shell terminal, type the following command and press Enter:
pwsh './RBAC_customer.txt' -
The script will start and display your current account and tenant information:
=== Azure Role Assignment Script ===
Connected as : yourname@yourdomain.com
Tenant ID    : xxxxxxxx-xxxx-xxxx-xxxx-xxxxxxxxxxxx
Object ID    : xxxxxxxx-xxxx-xxxx-xxxx-xxxxxxxxxxxx
Verify that the account shown is the correct one before continuing.
-
The script will scan your role assignments and display what it finds:
=== Your role assignments ===
  [Root Group]
This confirms your account has the required permissions to proceed.
-
You will then be prompted to choose at which level to assign the roles:
  1. Root Management Group
  2. Management Group (child)
  3. Subscription

Enter choice (1, 2 or 3):
In most cases, your Atea consultant will have advised you which number to choose. If in doubt, select
1— this assigns the roles at the highest level and ensures all subscriptions in your tenant are covered.Type the number and press Enter.
-
If you chose Management Group or Subscription, the script will display a numbered list. Enter the number(s) of the items you want to include, separated by commas (e.g.
1,3), and press Enter. -
The script will assign the roles and print a confirmation for each:
=== Assigning roles ===

Scope: Root Group
  Assigned 'Support Request Contributor' to 'd2bbd7ab-3014-484e-9690-fbd3b3ac19dc' on Root Group.
  Assigned 'Quota Request Operator' to 'd2bbd7ab-3014-484e-9690-fbd3b3ac19dc' on Root Group.

=== Role assignment complete ===

All Admin Agent groups were found and had roles assigned.
Lines showing
already assignedare expected and mean the role was already in place — no duplicate was created. Groups are shown by their Object ID rather than a name — this is normal, since the Admin Agent groups are "Foreign group" objects linked in via the Atea partner relationship and don't have a resolvable name in your directory.If the last line instead reads
=== Admin Agent groups NOT found - no roles were assigned ===followed by one or more Object IDs, it means those specific Admin Agent groups are not linked to your tenant — this is expected if not every support tier applies to you, but check with your Atea consultant if you are unsure. -
Scroll through the output and confirm there are no lines in red. If everything looks green (and any yellow "not found" summary matches what your consultant expects), the script has completed successfully.
If you enabled the elevation toggle in the Before you start section, disable it again now:
- In the Azure portal, go to Microsoft Entra ID → Properties.
- Toggle "Can manage access to all Azure subscriptions and management groups in this directory" back to No.
- Click Save.
This returns your account to its normal permissions. The role assignments created by the script for the Atea Admin Agent groups remain in place and are not affected.
If you encounter any issues during the process, contact your Atea consultant for assistance.